
Customer Portal
The Icon Map Customer Portal is the place to manage your Icon Map subscription(s), licence key(s), billing details, quotes, and usage reporting.
Accessing the portal
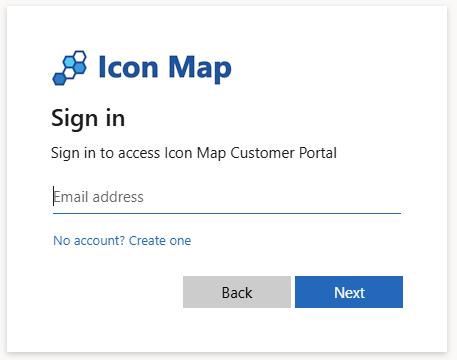
Open the portal by clicking Portal in the menu, or clicking Sign In.
You will see a standard Entra ID sign-in pop-up. If you already have an account, enter your email address and sign in. To create an account, click No account? Create one and enter your details.
Sign in uses a passwordless system, Azure will send you a unique code by email each time you log in.
Note: The portal is designed to be as flexible as possible regarding accounts, allowing multiple shared accounts to be set up within an organisation. For example, you may wish to have an account per department to manage licensing separately. If you sign in and you have not already been invited to an existing Icon Map account, the portal will automatically create a new account for you on first login. If your company or department already has a central account where you manage an existing Icon Map licence, please speak to the account owner to get an invite before signing in.
Important: Invites are tenant-scoped. The invited user must be in the same Microsoft tenant as the account, unless the account has been created against a personal account such as gmail.com, in this case any other personal account can be invited.
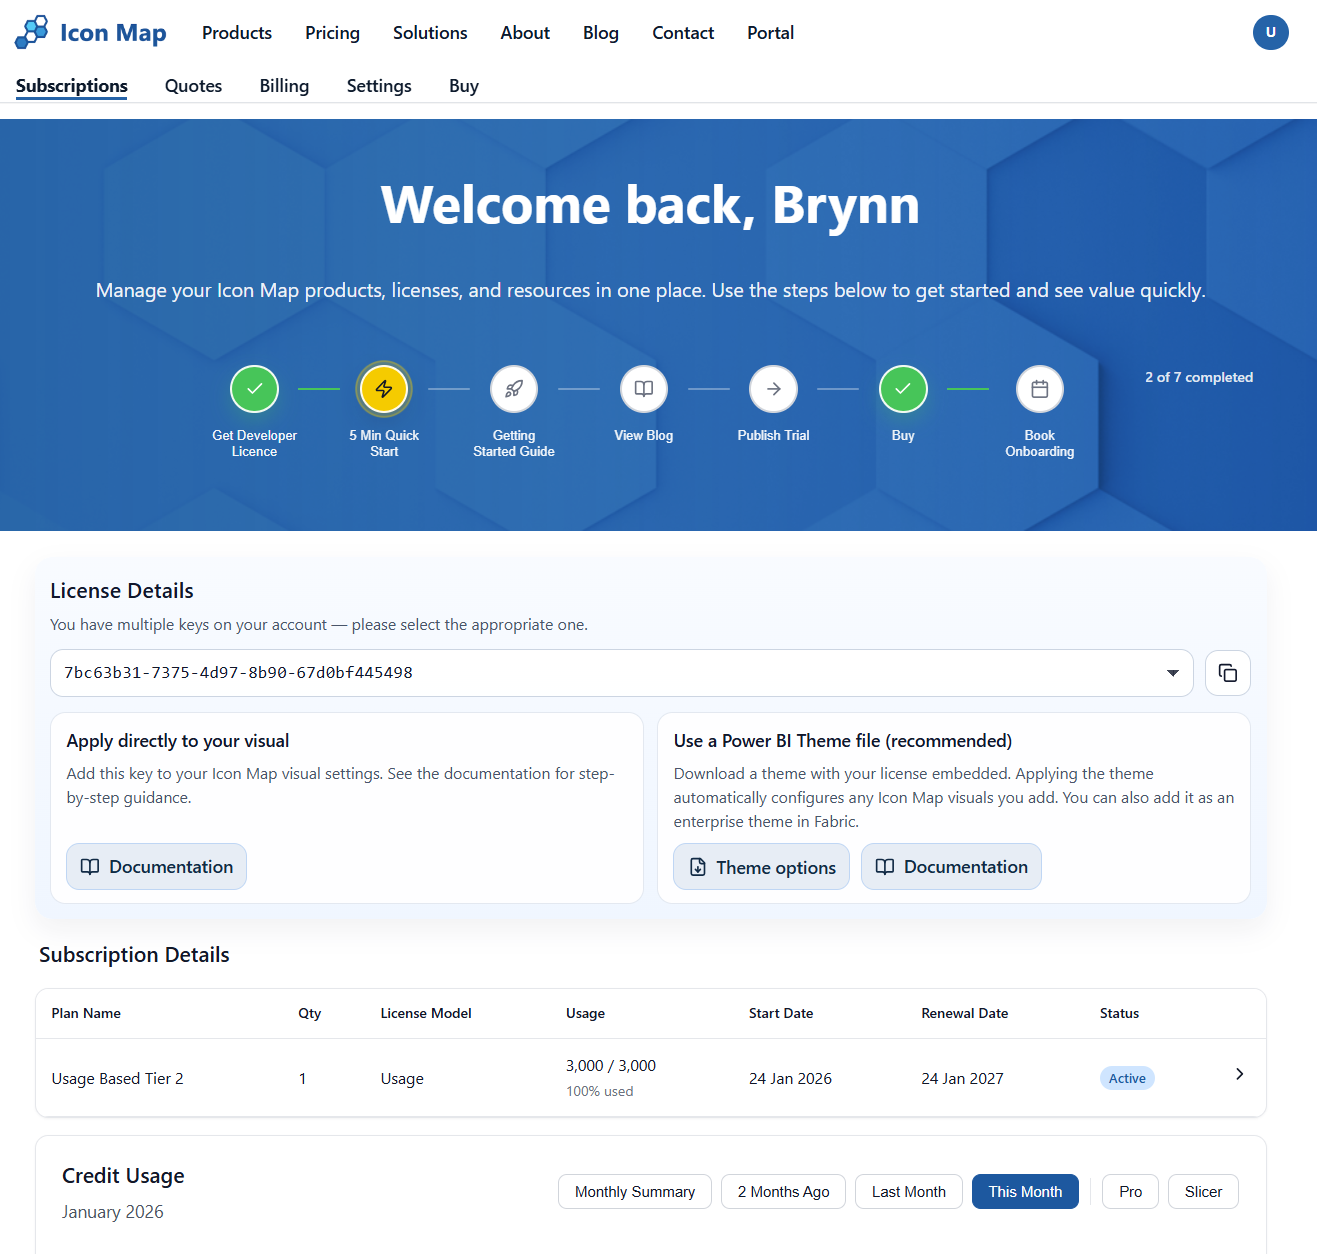
The Subscriptions page (portal home)
After sign-in, the portal lands on Subscriptions. This page combines the “at a glance” information you’ll use most often.
Getting started checklist
At the top you’ll see a Getting started progress checklist. This is intended to guide you through the most common steps when getting started with Icon Map.

Developer License (Free)
We are currently offering a FREE 6 Month Developer licence which allows you to use both products in either Power BI Desktop or Power BI Service Edit Mode. We hope this will give you ample time to build out your use case, and see the value of the product before committing to a purchase.
To get your licence, simply click on the checklist item and complete the form.
License Details
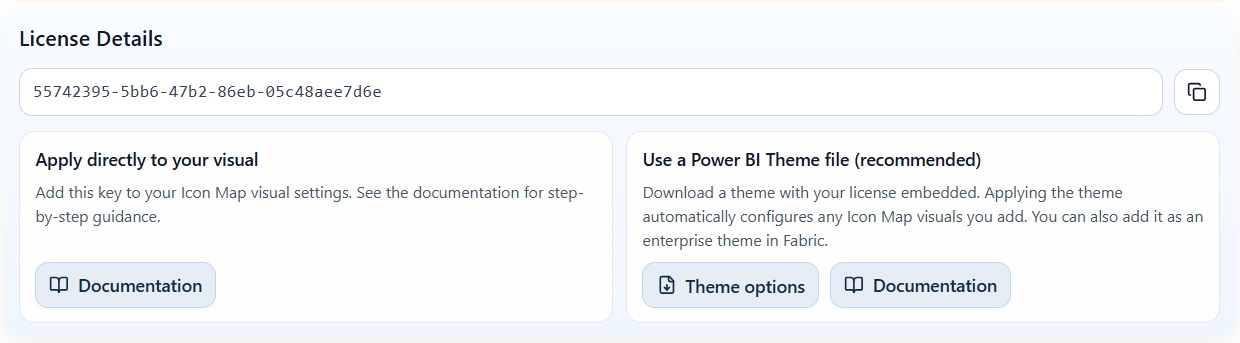
Once you have either purchased, or activated your free developer licence, you will see details of the licence key on the portal home page. If you have multiple keys there will be a dropdown to allow you to switch between licences.
The licence details provide two options to apply the licence:
- Directly: Copy the active key, then follow the documentation for the steps to apply this to the visual. Note: this is persisted within the visual settings, so it needs to be applied each time you add a visual to a report.
- Using a Power BI Theme: To avoid having to enter the key every time you add the visual, you can download a Power BI theme file with the licence key embedded. This can then be used in your report, see more details here. If you already have a company theme for styling, you can upload it and we will embed the key in it for you automatically.
You will then see details of the current subscription you have, which will differ slightly depending on the type of licence.
For Developer or Trial licences you will see details such as the current status, and start and end dates.
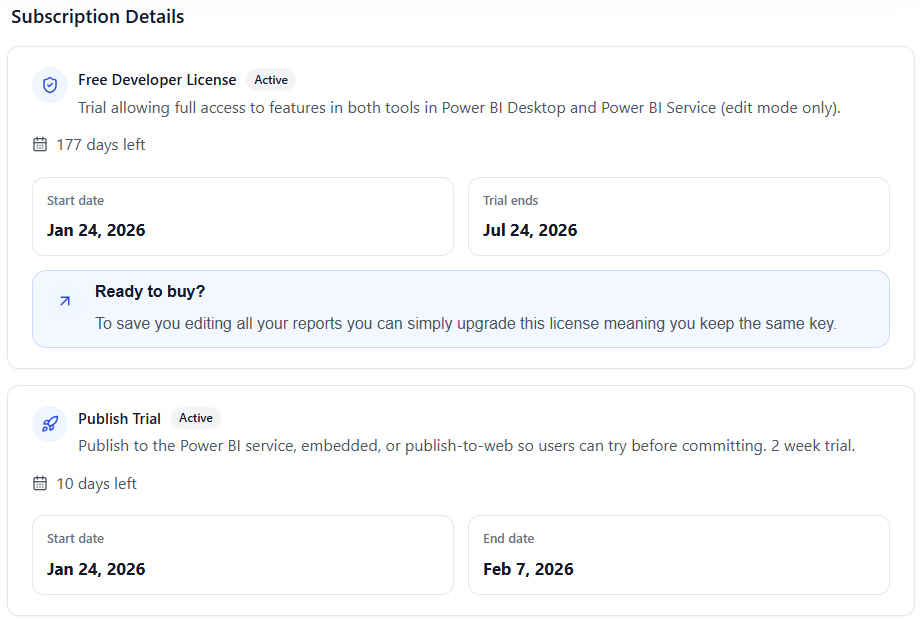
The following buttons will be available:
- Request a Publish Trial: When you are ready to publish your reports for user acceptance testing, you can use this button to get a free 2 week trial.
- Request an extension: If your 2 week trial has expired you can request an extension. The first extension will be automatic, after that we will review on a case-by-case basis.
- Ready to buy? When you are ready to buy you can upgrade your developer licence. This means you will keep the same licence key, avoiding the need to update all reports you have built.
For Paid Usage-Based and Enterprise Subscriptions, you will see a table listing the subscriptions you have. Click a subscription row to open its Subscription details page.

Credit Usage
If you have subscribed to our usage-based licensing, you can view your current usage in the Credit Usage section.
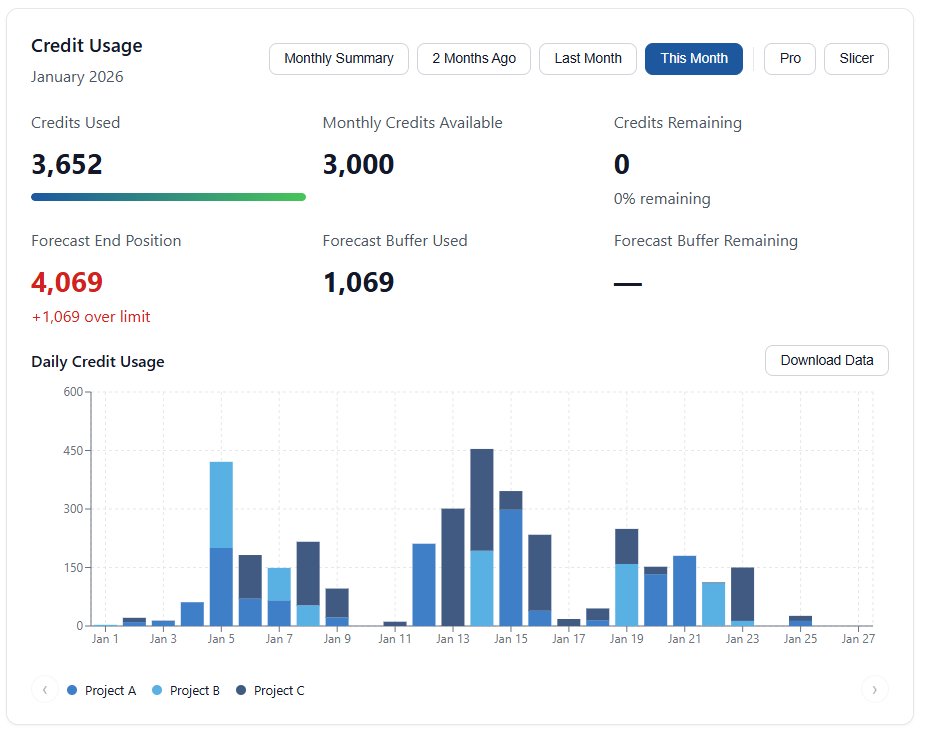
This provides the following detail about your usage.
- KPI tiles
- Credits Used: The total credits you have consumed so far this calendar month.
- Allowance: The total monthly allowance you have available as part of your subscription.
- Remaining: The remaining amount of credits this month.
- Forecast End Position: Based on your average usage over the past 2 weeks, we project this forward to the end of the month to predict the end position.
- Forecast Buffer Used: If you have purchased an annual usage subscription you will receive an annual buffer equivalent to one month’s worth of transactions. If you go slightly over in a single month you will use the buffer. In the example above you can see we are forecast to go over our limit by 1,069, therefore 1,069 transactions will be used from the buffer.
- Forecast Buffer Remaining: This is the buffer we predict you will have left at the end of the month. In the example above we are forecasting the buffer will be fully utilised in this month, meaning there is less than the 1,069 forecast overage available. In this scenario, as soon as the buffer is exhausted the subscription will be automatically upgraded to ensure there are enough credits available, and prevent any effect on the end user.
- Usage Charts: There are 4 interactive charts showing your daily usage breakdown over This Month, Last Month, or 2 Months Ago. You can also view a monthly summary for the past 12 months. If you are utilising both products, Icon Map Pro and Icon Map Slicer, you can filter the usage by product using the Pro and Slicer buttons.
- Customer Reference Breakdown: If you are using a single usage licence across multiple projects, teams, or reports, we have an optional Customer Reference field in the Power BI Icon Map Visual properties next to the License Key property. This can be populated with anything you want, for example the project name, team name, or a tracking code. This will then appear in the legend of the charts, allowing you to view usage at this lower level of detail. In the example above Projects A, B, and C have been entered.
Alerts Banner
If you have any open quotes or usage alerts, you’ll see a banner at the top of the page. Clicking it takes you straight to the detail.

Subscription details
When you click a subscription in the table it will display additional details of the subscription, as shown below.
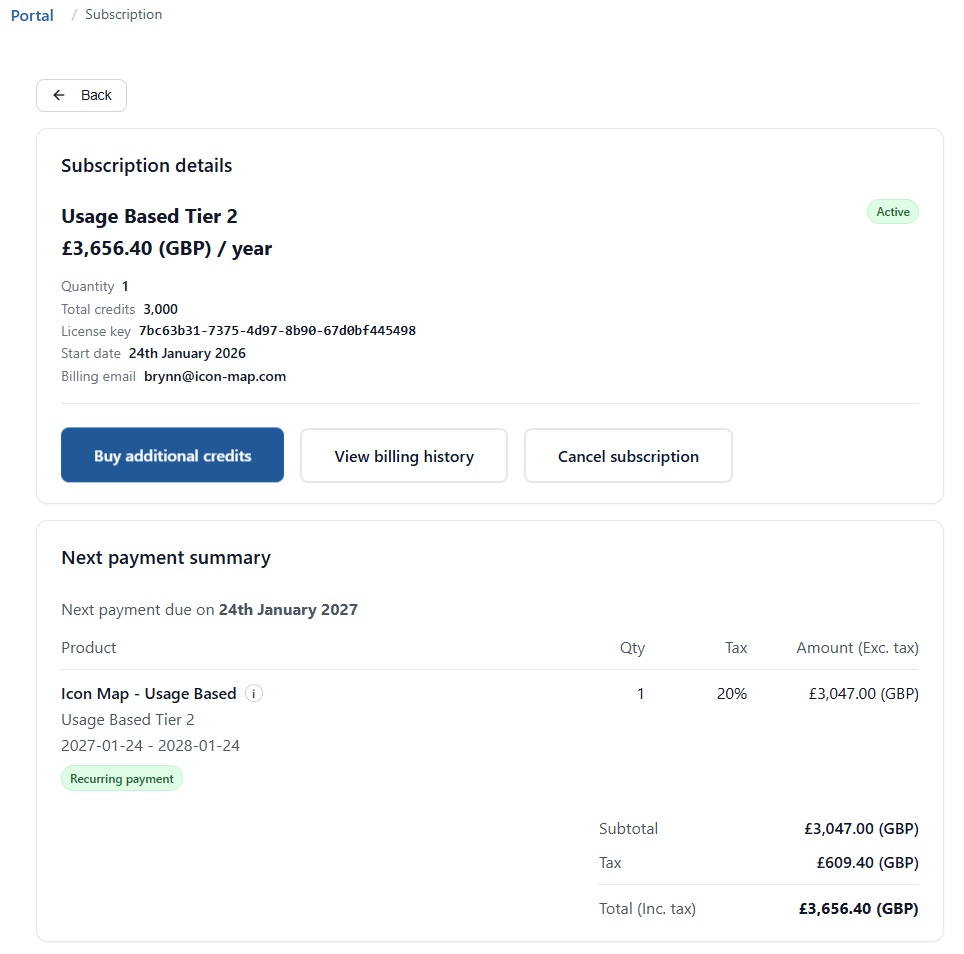
If this subscription has been purchased via the portal then you will see the following buttons.
Buy additional credits
For Paddle-managed usage subscriptions, Buy additional credits takes you to an “Amend subscription” flow where you can increase tier or quantity. The screen will automatically suggest what tier you require based on your current forecast shortage. This can be amended as desired, before clicking Update subscription now. At this point the subscription will be updated, and Paddle will automatically charge a prorated adjustment amount to the existing term.
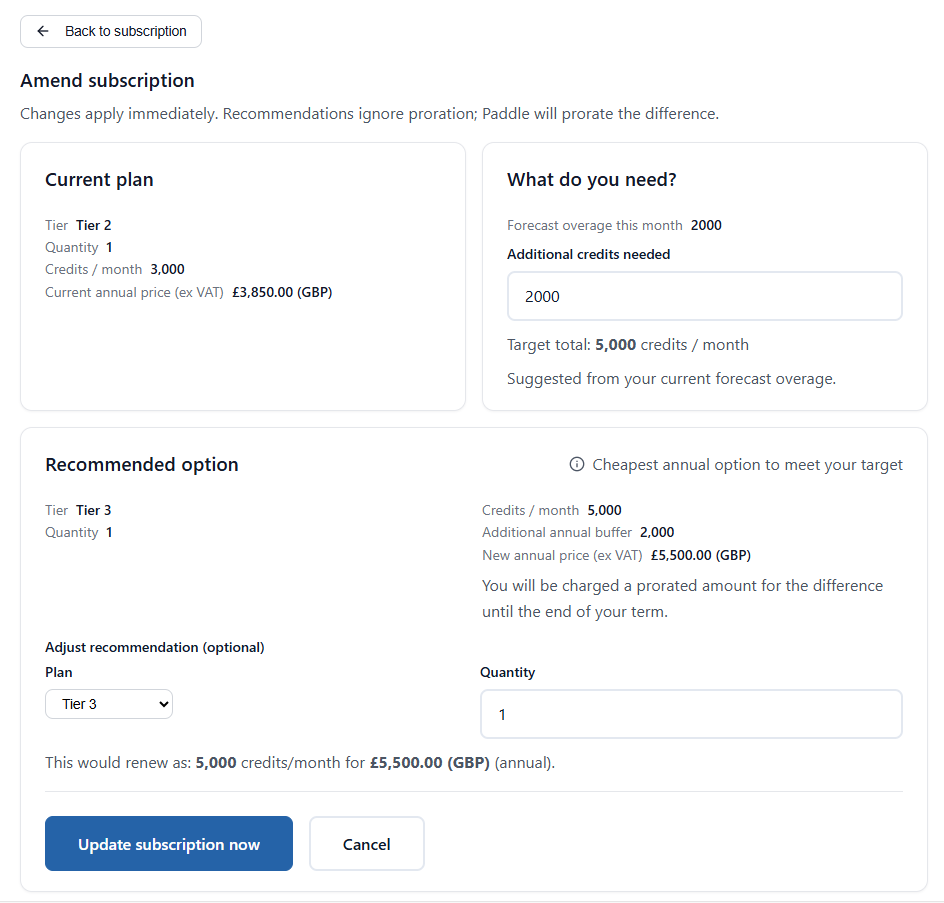
Note: The system will automatically upgrade you as soon as you utilise your entire buffer and have no credits remaining.
Note: It is only possible to upgrade a subscription, not downgrade it. If you wish to downgrade you can cancel the existing plan and then renew on a lower tier at the end of the subscription term.
View billing history
For Paddle-managed subscriptions, you can click View billing history to see payments and download invoice PDFs.
Cancellations
For Paddle-managed subscriptions you can opt to cancel your subscription by clicking Cancel subscription. This will take effect at the end of the current subscription term, it effectively disables the automated renewal, and the licence will remain available for the rest of the term.
Once cancelled you will see a warning banner with a button to reverse the decision to cancel if required.
AppSource-managed subscriptions
If a subscription was purchased outside of the portal, either via Microsoft AppSource or directly from Tekantis, the portal will still show details for the following subscription types:
- Usage Based (including the old Embedded and Publish to Web plans)
- Capacity Based
- Enterprise Licences
If you wish to move the subscription across to be managed within the portal please contact support@tekantis.com
The portal does not currently show details of user-based licensing, please go to the Microsoft 365 Admin Portal to see and manage these licences.
Buying a License
The Icon Map Pro licensing portal supports several commercial models, allowing organisations to choose the option that best fits their procurement route, deployment scenario, and expected usage.
When purchasing a licence, the appropriate flow will depend on whether you are evaluating the product, licensing for individual users, or supporting large scale enterprise or embedded deployments.
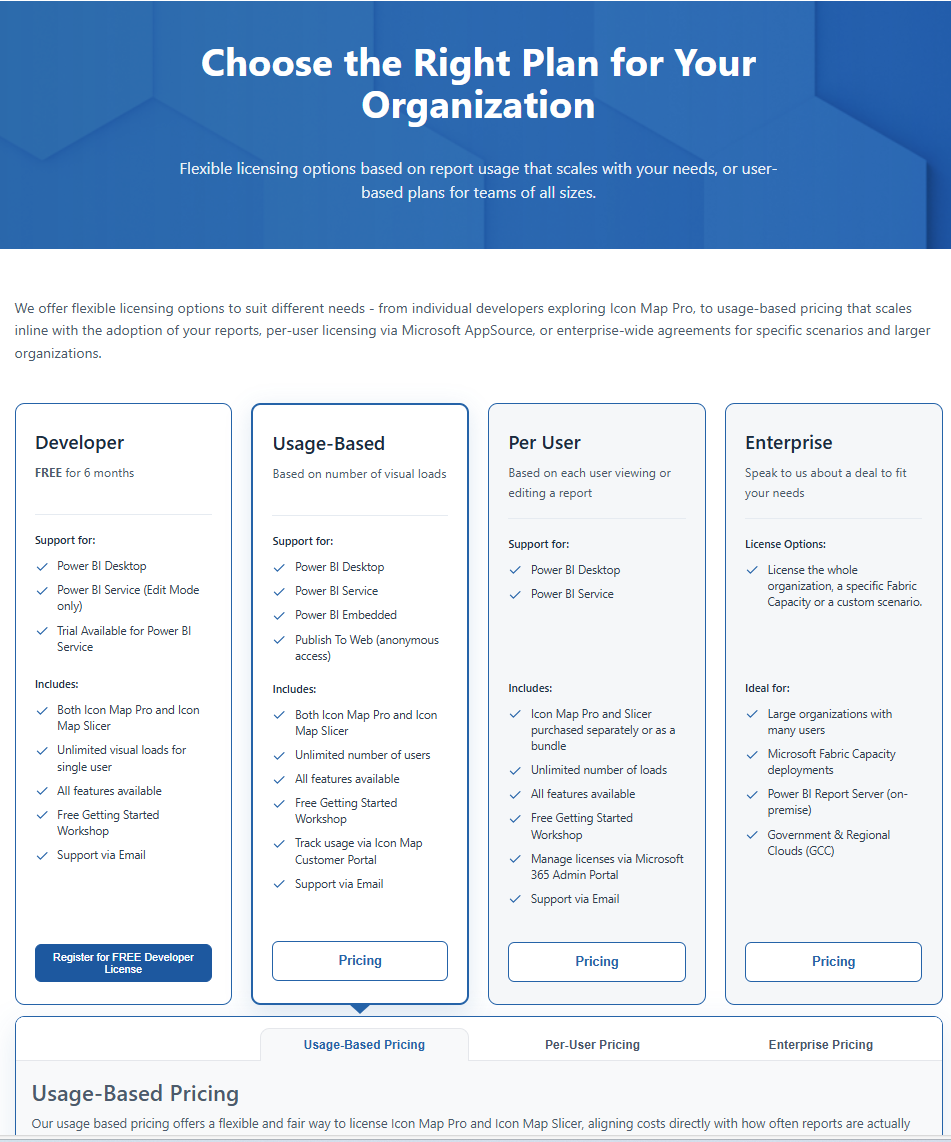
Developer Plan (Free 6 Month License)
The Developer Plan is intended for early stage evaluation, testing, and development work.
It is ideal if you are exploring Icon Map Pro before committing to a commercial subscription.
This plan supports:
- Power BI Desktop for report development
- Power BI Service in edit mode for testing within a workspace
Developer licences are requested directly through the portal using the Developer Licence request flow. You can also request a 2 week publish trial once you are ready to share what have built.
Usage Based Plans
Usage based plans are designed for organisations that need flexibility, scalability, or licensing based on consumption rather than named users.
These plans are purchased through the portal using Paddle checkout, with pricing that scales according to:
- Credit tiers
- Quantity (for certain tiers)
This model is best suited for:
- Large organisations with many viewers
- Embedded Power BI scenarios
- Variable or unpredictable usage patterns
Usage plans can be purchased and managed directly within the Portal.
Per User Plans (Microsoft AppSource)
Per user plans provide predictable licensing based on the number of named Power BI users.
These subscriptions are purchased directly via Microsoft AppSource and assigned and managed within the Microsoft 365 Admin Centre.
Key features include:
- Fixed, user based pricing
- Subscription management handled entirely by Microsoft
- Billing history available within Microsoft, rather than in this portal
Enterprise Licensing
For enterprise agreements, regulated environments, or special deployment requirements, Icon Map Pro offers an Enterprise licensing route.
This option is suitable for:
- Organisation wide agreements
- Government or restricted cloud environments
- Custom commercial arrangements
To proceed, select the Enterprise option in the portal and contact the Icon Map team for direct support.
Buying Directly in the Portal - Usage Based Only
Currently we only support usage-based purchases directly in the portal. In the future we plan to add support for licensing models such as enterprise, capacity-based, and report server plans. Until then please contact sales@tekantis.com for more details.
Note: Purchasing user-based licences must currently be done within the Microsoft AppSource Marketplace, as the assignment of user licences is managed by Microsoft in their standard 365 Admin Portal. If for any reason you cannot purchase via this route, for example you need to use a reseller, please reach out to sales@tekantis.com as we can offer an alternative in some instances.
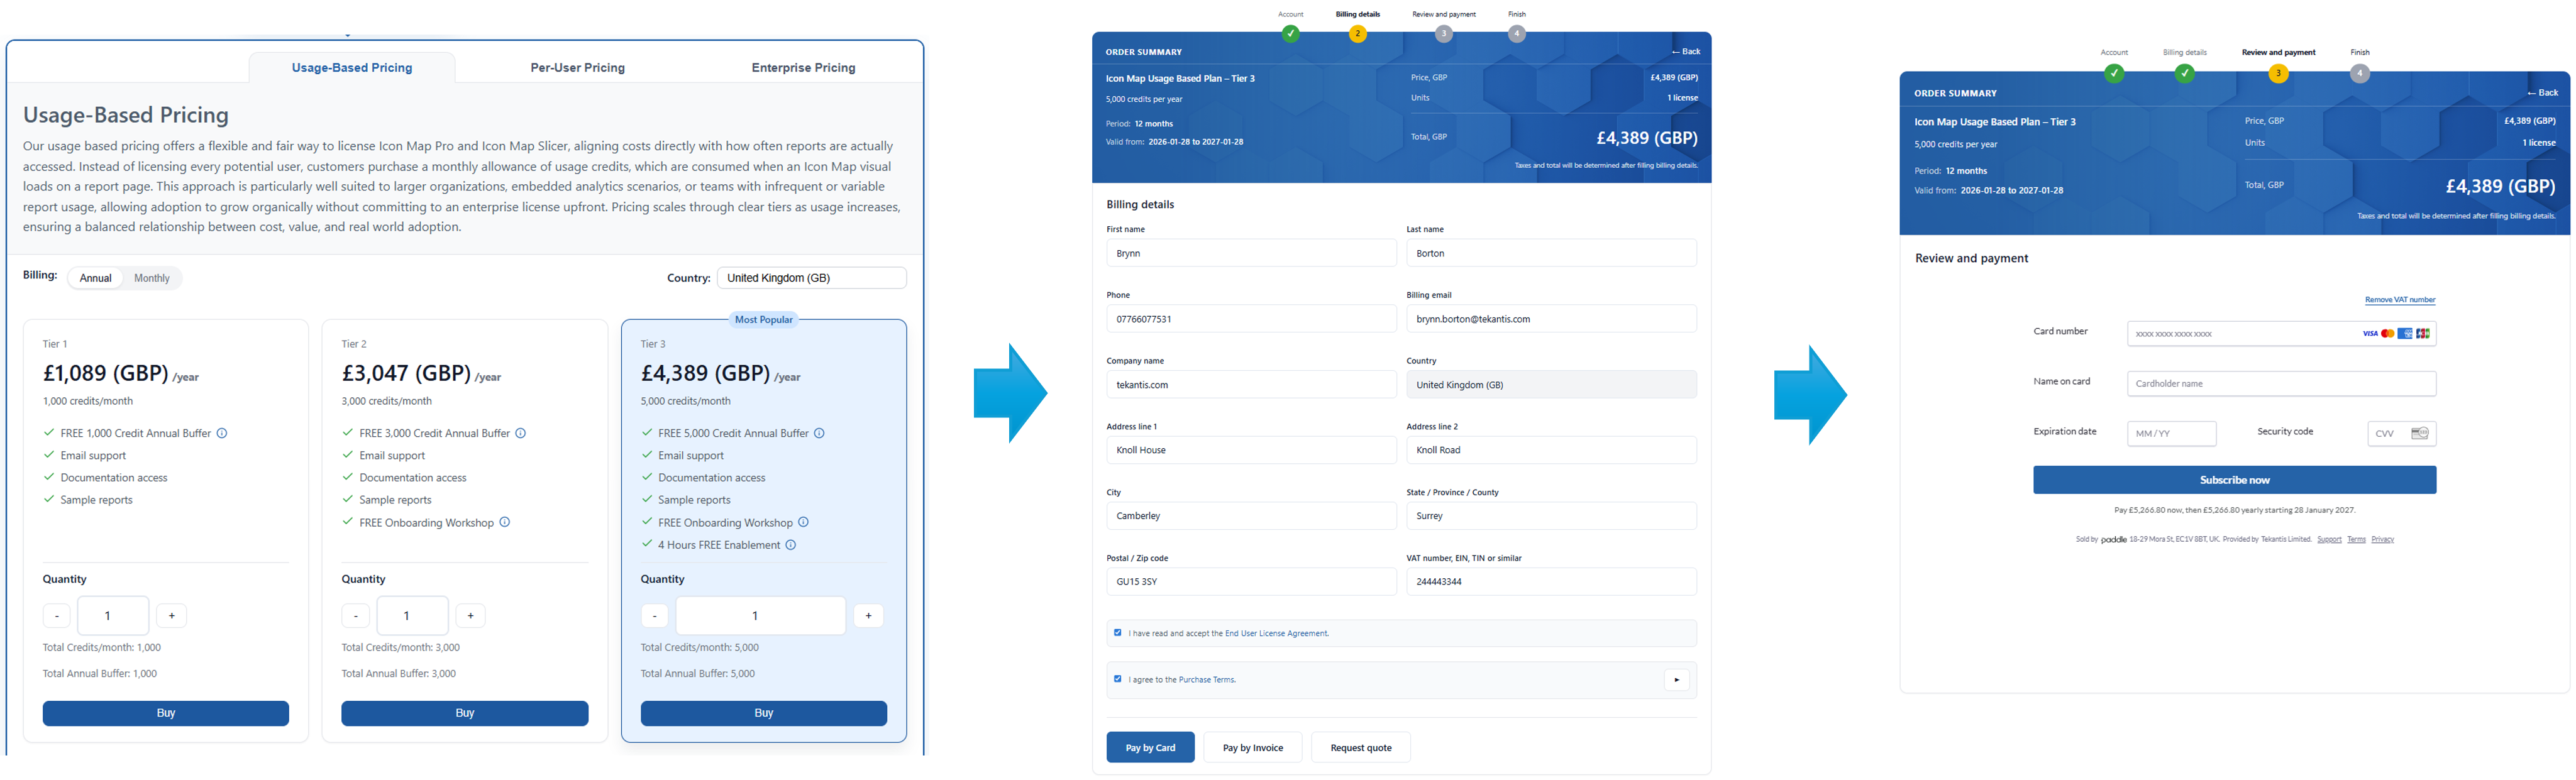
The portal provides two methods to pay for the licences.
Pay by card
Simply:
- Select your desired usage-based plan and quantity.
- Make sure you have the right country selected, this will default to your billing profile country if you have already set this up.
- Click Buy.
- Complete Billing Details and accept the EULA, purchase terms.
- Click Pay by Card to open the Paddle checkout.
- Enter your card details and complete the purchase.
- After successful payment, click Finish to view your licence and subscription details, these will be active immediately.
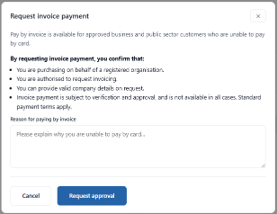
Pay by invoice (approval required)
If you are unable to pay by card for any reason you can request the ability to pay by invoice over wire transfer. To do this, click Pay By Invoice, you will see a simple approval form, complete the details and we will review and enable it for you if you meet the criteria.
If this is the first time, the portal will show a Request invoice payment form where you:
- Confirm eligibility statements
- Provide a reason for paying by invoice
- Submit a request for review
Once approved, you’ll be able to confirm invoice payment by clicking the same Pay By Invoice button. This takes you to a confirmation screen where you can optionally provide a purchase order number before confirming the purchase.
The licence will be enabled and usable immediately. You will then receive an invoice from our payments provider Paddle.com.
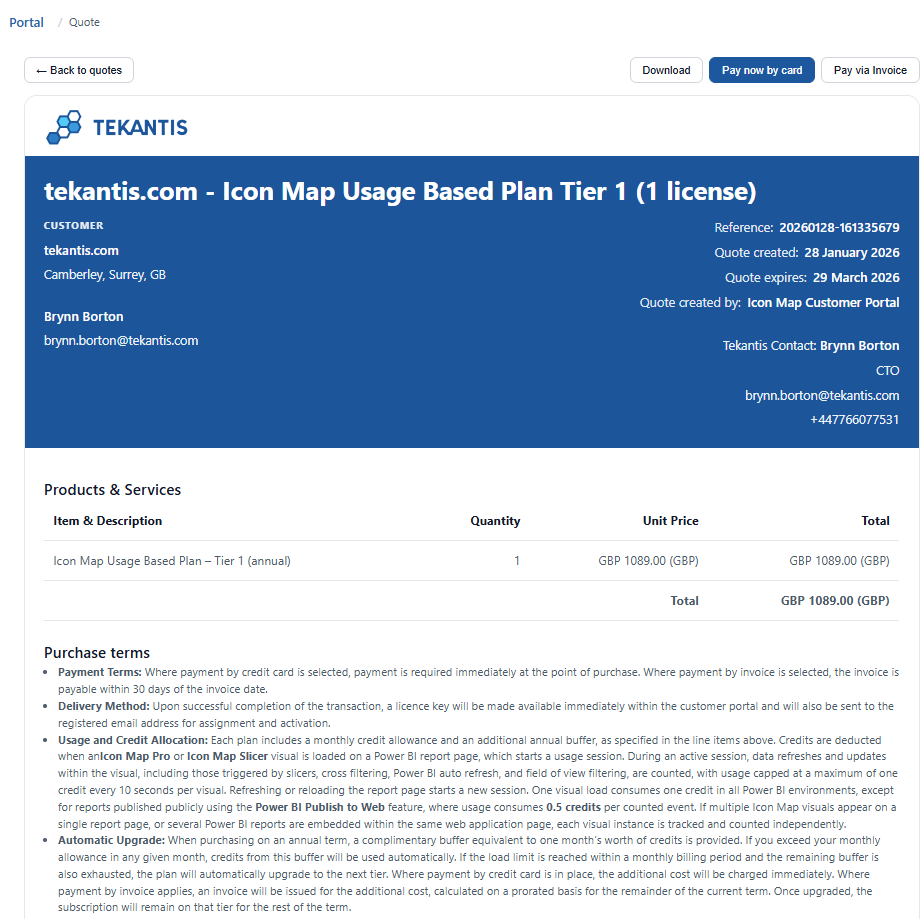
Request a quote
If you need a formal document for internal approvals you can simply click the Request quote button. You will be taken to the quote page where you can download the PDF and share it internally.
The quote page also contains payment buttons to make it easy for you to purchase the quote once approved.
Quotes
The Quotes area is for managing formal quotations you have previously created. You will see two lists:
- Open Quotes (not expired)
- Past Quotes (expired or completed)
Click on them to see the quotes page where you can:
- Download the quote as a PDF
- Pay now by card
- Pay via Invoice (approval may be required, see above)
Billing history (Paddle purchases only)
The Billing History page lists recent payments and lets you download invoice PDFs.
Important limitations:
- Only Paddle billing is shown here (usage-based purchases)
- If you purchased via Microsoft AppSource, billing and invoices are managed by Microsoft and are outside the scope of the portal currently
Settings
Open Settings to manage your profile, billing details, and account access.
Profile
Update your:
- First name / last name
- Job title
Company & Billing Details
Manage the billing profile used for checkout and quotes, including:
- Billing contact details (including billing email)
- Company name and address
- Tax ID (VAT/EIN/TIN, etc.)
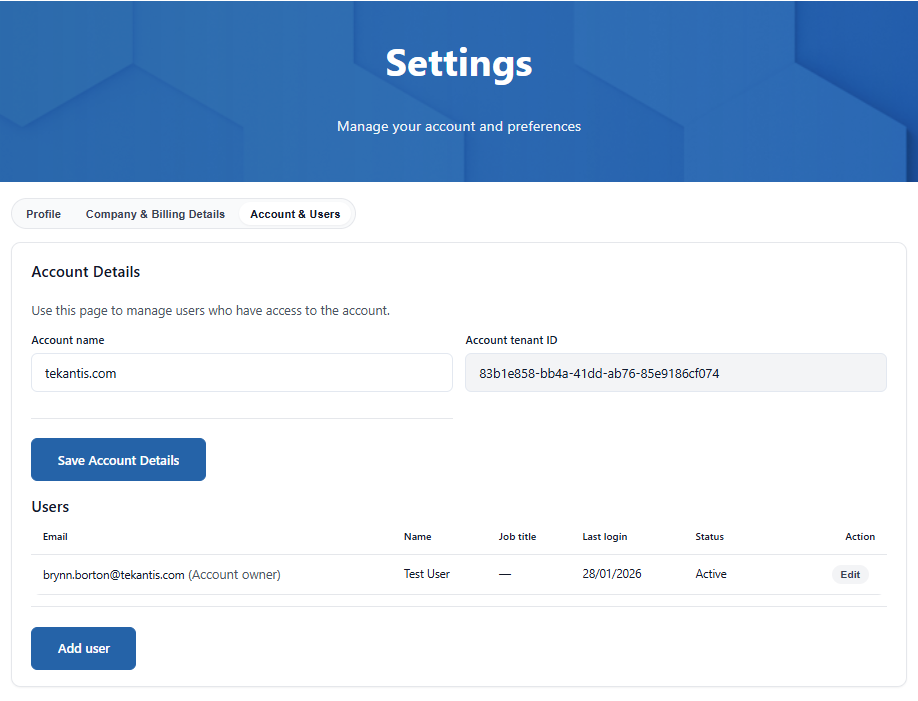
Account & Users
The portal has been designed to be as flexible as possible to meet the needs of all types of our customers, from small teams to large enterprises. We therefore allow as many accounts as you wish within a single organisation.
When you first log in, an account will be created for you unless you have been specifically invited to another account.
The owner of the account can then add or disable access to members of their team using this page.